Showing posts with label CodeIgniter. Show all posts

Saturday, July 27, 2019

Form validation in Codeigniter?

Validation is an important process while building web application. It ensures that the data that we are getting is proper and valid to store or process. CodeIgniter has made this task very easy. Let us understand this process with a simple example.

Example

Create a view file myform.php and save the below code it in application/views/myform.php. This page will display form where user can submit his name and we will validate this page to ensure that it should not be empty while submitting.
<html>
 
   <head> 
      <title>My Form</title> 
   </head>
 
   <body>
      <form action = "" method = "">
         <?php echo validation_errors(); ?>  
         <?php echo form_open('form'); ?>  
         <h5>Name</h5> 
         <input type = "text" name = "name" value = "" size = "50" />  
         <div><input type = "submit" value = "Submit" /></div>  
      </form>  
   </body>
 
</html>
Create a view file formsuccess.php and save it in application/views/formsuccess.php. This page will be displayed if the form is validated successfully.
<html>
 
   <head> 
      <title>My Form</title>
   </head> 
 
   <body>  
      <h3>Your form was successfully submitted!</h3>  
      <p><?php echo anchor('form', 'Try it again!'); ?></p>  
   </body>
 
</html>
Create a controller file Form.php and save it in application/controller/Form.php. This form will either, show errors if it is not validated properly or redirected to formsuccess.php page.
<?php
  
   class Form extends CI_Controller { 
 
      public function index() { 
         /* Load form helper */ 
         $this->load->helper(array('form'));
   
         /* Load form validation library */ 
         $this->load->library('form_validation');
   
         /* Set validation rule for name field in the form */ 
         $this->form_validation->set_rules('name', 'Name', 'required'); 
   
         if ($this->form_validation->run() == FALSE) { 
         $this->load->view('myform'); 
         } 
         else { 
            $this->load->view('formsuccess'); 
         } 
      }
   }
?>
Add the following line in application/config/routes.php.
$route['validation'] = 'Form';
Let us execute this example by visiting the following URL in the browser. This URL may be different based on your site.
http://yoursite.com/index.php/validation
It will produce the following screen −
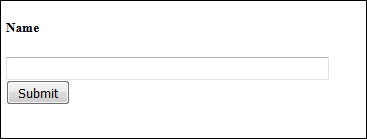
Validation Form
We have added a validation in the controller − Name is required field before submitting the form. So, if you click the submit button without entering anything in the name field, then you will be asked to enter the name before submitting as shown in the screen below.
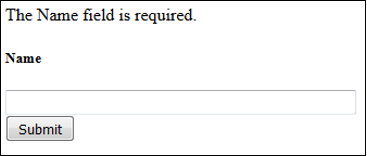
Not Validated Successfully
After entering the name successfully, you will be redirected to the screen as shown below.
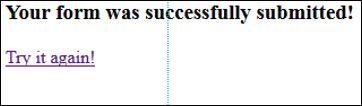
Validated Successfully
In the above example, we have used the required rule setting. There are many rules available in the CodeIgniter, which are described below.

Validation Rule Reference

The following is a list of all the native rules that are available to use −

What is Security in Codeigniter?

XSS Prevention

XSS means cross-site scripting. CodeIgniter comes with XSS filtering security. This filter will prevent any malicious JavaScript code or any other code that attempts to hijack cookie and do malicious activities. To filter data through the XSS filter, use the xss_clean() method as shown below.
$data = $this->security->xss_clean($data);
You should use this function only when you are submitting data. The optional second Boolean parameter can also be used to check image file for XSS attack. This is useful for file upload facility. If its value is true, means image is safe and not otherwise.

SQL Injection Prevention

SQL injection is an attack made on database query. In PHP, we are use mysql_real_escape_string() function to prevent this along with other techniques but CodeIgniter provides inbuilt functions and libraries to prevent this.
We can prevent SQL Injection in CodeIgniter in the following three ways −
  • Escaping Queries
  • Query Biding
  • Active Record Class

Escaping Queries

<?php
   $username = $this->input->post('username');
   $query = 'SELECT * FROM subscribers_tbl WHERE user_name = '.
      $this->db->escape($email);
   $this->db->query($query);
?>
$this->db->escape() function automatically adds single quotes around the data and determines the data type so that it can escape only string data.

Query Biding

<?php
   $sql = "SELECT * FROM some_table WHERE id = ? AND status = ? AND author = ?";
   $this->db->query($sql, array(3, 'live', 'Rick'));
?>
In the above example, the question mark(?) will be replaced by the array in the second parameter of query() function. The main advantage of building query this way is that the values are automatically escaped which produce safe queries. CodeIgniter engine does it for you automatically, so you do not have to remember it.

Active Record Class

<?php
   $this->db->get_where('subscribers_tbl',array
      ('status'=> active','email' => 'info@arjun.net.in'));
?>
Using active records, query syntax is generated by each database adapter. It also allows safer queries, since the values escape automatically.

Hiding PHP Errors

In production environment, we often do not want to display any error message to the users. It is good if it is enabled in the development environment for debugging purposes. These error messages may contain some information, which we should not show to the site users for security reasons.
There are three CodeIgniter files related with errors.

PHP Error Reporting Level

Different environment requires different levels of error reporting. By default, development will show errors but testing and live will hide them. There is a file called index.php in root directory of CodeIgniter, which is used for this purpose. If we pass zero as argument to error_reporting() function then that will hide all the errors.

Database Error

Even if you have turned off the PHP errors, MySQL errors are still open. You can turn this off in application/config/database.php. Set the db_debugoption in $db array to FALSE as shown below.
$db['default']['db_debug'] = FALSE;

Error log

Another way is to transfer the errors to log files. So, it will not be displayed to users on the site. Simply, set the log_threshold value in $config array to 1 in application/cofig/config.php file as shown below.
$config['log_threshold'] = 1;

CSRF Prevention

CSRF stands for cross-site request forgery. You can prevent this attack by enabling it in the application/config/config.php file as shown below.
$config['csrf_protection'] = TRUE;
When you are creating form using form_open() function, it will automatically insert a CSRF as hidden field. You can also manually add the CSRF using the get_csrf_token_name() and get_csrf_hash() function. The get_csrf_token_name() function will return the name of the CSRF and get_csrf_hash() will return the hash value of CSRF.
The CSRF token can be regenerated every time for submission or you can also keep it same throughout the life of CSRF cookie. By setting the value TRUE, in config array with key ‘csrf_regenerate’ will regenerate token as shown below.
$config['csrf_regenerate'] = TRUE;
You can also whitelist URLs from CSRF protection by setting it in the config array using the key ‘csrf_exclude_uris’ as shown below. You can also use regular expression.
$config['csrf_exclude_uris'] = array('api/person/add');

Password Handling

Many developers do not know how to handle password in web applications, which is probably why numerous hackers find it so easy to break into the systems. One should keep in mind the following points while handling passwords −
  • DO NOT store passwords in plain-text format.
  • Always hash your passwords.
  • DO NOT use Base64 or similar encoding for storing passwords.
  • DO NOT use weak or broken hashing algorithms like MD5 or SHA1. Only use strong password hashing algorithms like BCrypt, which is used in PHP’s own Password Hashing functions.
  • DO NOT ever display or send a password in plain-text format.
  • DO NOT put unnecessary limits on your users’ passwords.

What is Internationalization in Codeigniter?

The language class in CodeIgniter provides an easy way to support multiple languages for internationalization. To some extent, we can use different language files to display text in many different languages.
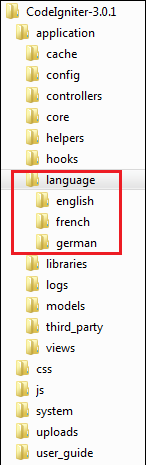
We can put different language files in application/language directory. System language files can be found at system/language directory, but to add your own language to your application, you should create a separate folder for each language in application/language directory.

Creating files Language

To create a language file, you must end it with _lang.php. For example, you want to create a language file for French language, then you must save it with french_lang.php. Within this file you can store all your language texts in key, value combination in $lang array as shown below.
$lang[‘key’] = ‘val’;

Loading Language file

To use any of the language in your application, you must first load the file of that particular language to retrieve various texts stored in that file. You can use the following code to load the language file.
$this->lang->load('filename', 'language');
  • filename − It is the name of file you want to load. Don’t use extension of file here but only name of file.
  • Language − It is the language set containing it.

Fetching Language Text

To fetch a line from the language file simply execute the following code.
$this->lang->line('language_key');
Where language_key is the key parameter used to fetch value of the key in the loaded language file.

Autoload Languages

If you need some language globally, then you can autoload it in application/config/autoload.php file as shown below.
| -----------------------------------------------------------------------
|  Auto-load Language files
| -----------------------------------------------------------------------
| Prototype:
|   $autoload['language'] = array('lang1', 'lang2');
|
| NOTE: Do not include the "_lang" part of your file. For example
| "codeigniter_lang.php" would be referenced as array('codeigniter');
|
*/
$autoload['language'] = array();
Simply, pass the different languages to be autoloaded by CodeIgniter.

Example

Create a controller called Lang_controller.php and save it in application/controller/Lang_controller.php
<?php
   class Lang_controller extends CI_Controller {

      public function index(){
         //Load form helper
         $this->load->helper('form');

         //Get the selected language
         $language = $this->input->post('language');
  
         //Choose language file according to selected lanaguage
         if($language == "french")
            $this->lang->load('french_lang','french');
         else if($language == "german")
            $this->lang->load('german_lang','german');
         else
         $this->lang->load('english_lang','english');
  
         //Fetch the message from language file.
         $data['msg'] = $this->lang->line('msg');
  
         $data['language'] = $language;
         //Load the view file
         $this->load->view('lang_view',$data);
      }
   }
?>
Create a view file called lang_view.php and save it at application/views/ lang_view.php
<!DOCTYPE html>
<html lang = "en"> 

   <head>
      <meta charset = "utf-8">
      <title>CodeIgniter Internationalization Example</title>
   </head>
 
   <body>
      <?php
         echo form_open('/lang');
      ?>
  
      <select name = "language" onchange = "javascript:this.form.submit();">
         <?php
            $lang = array('english'=>"English",'french'=>"French",'german'=>"German");
    
            foreach($lang as $key=>$val) {
               if($key == $language)
               echo "<option value = '".$key."' selected>".$val."</option>";
               else
               echo "<option value = '".$key."'>".$val."</option>";
            }
    
         ?>
   
      </select>
  
      <br>
  
      <?php
         form_close();
         echo $msg;
      ?>
  
   </body>
 
</html>
Create three folders called English, French, and German in application/language as shown in the figure below.
Three Folders
Copy the below given code and save it in english_lang.php file in application/language/english folder.
<?php
   $lang['msg'] = "CodeIgniter Internationalization example.";
?>
Copy the below given code and save it in french_lang.php file in application/language/French folder.
<?php
   $lang['msg'] = "Exemple CodeIgniter internationalisation.";
?>
Copy the below given code and save it in german_lang.php file in application/language/german folder.
<?php
   $lang['msg'] = "CodeIgniter Internationalisierung Beispiel.";
?>
Change the routes.php file in application/config/routes.php to add route for the above controller and add the following line at the end of the file.
$route['lang'] = "Lang_controller";
Execute the following URL in the browser to execute the above example.
http://yoursite.com/index.php/lang
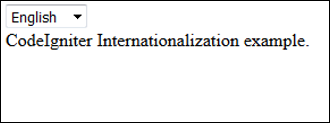
It will produce an output as shown in the following screenshot. If you change the language in the dropdown list, the language of the sentence written below the dropdown will also change accordingly.
Internationalization Example

How to Add CSS and JS in Codeigniter?

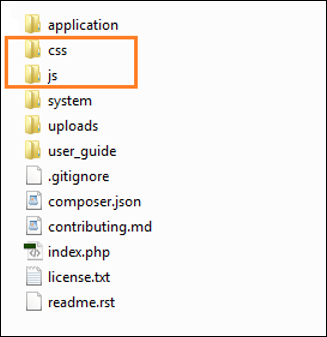
Adding JavaScript and CSS (Cascading Style Sheet) file in CodeIgniter is very simple. You have to create JS and CSS folder in root directory and copy all the .js files in JS folder and .css files in CSS folder as shown in the figure.
Adding JS and CSS
For example, let us assume, you have created one JavaScript file sample.jsand one CSS file style.css. Now, to add these files into your views, load URL helper in your controller as shown below.
$this->load->helper('url');
After loading the URL helper in controller, simply add the below given lines in the view file, to load the sample.js and style.css file in the view as shown below.
<link rel = "stylesheet" type = "text/css" 
   href = "<?php echo base_url(); ?>css/style.css">

<script type = 'text/javascript' src = "<?php echo base_url(); 
   ?>js/sample.js"></script>

Example

Create a controller called Test.php and save it in application/controller/Test.php
<?php 
   class Test extends CI_Controller {
 
      public function index() { 
         $this->load->helper('url'); 
         $this->load->view('test'); 
      } 
   } 
?>
Create a view file called test.php and save it at application/views/test.php
<!DOCTYPE html> 
<html lang = "en">
 
   <head> 
      <meta charset = "utf-8"> 
      <title>CodeIgniter View Example</title> 
      <link rel = "stylesheet" type = "text/css" 
         href = "<?php echo base_url(); ?>css/style.css"> 
      <script type = 'text/javascript' src = "<?php echo base_url(); 
         ?>js/sample.js"></script> 
   </head>
 
   <body> 
      <a href = 'javascript:test()'>Click Here</a> to execute the javascript function. 
   </body>
 
</html>
Create a CSS file called style.css and save it at css/style.css
body { 
   background:#000; 
   color:#FFF; 
}
Create a JS file called sample.js and save it at js/sample.js
function test() { 
   alert('test'); 
}
Change the routes.php file in application/config/routes.php to add route for the above controller and add the following line at the end of the file.
$route['profiler'] = "Profiler_controller"; 
$route['profiler/disable'] = "Profiler_controller/disable"
Use the following URL in the browser to execute the above example.
http://yoursite.com/index.php/test