Thursday, December 26, 2019

Date Format change using Jquery.

var pickdate_get =  date.toInputFormat();
var pick_date_frmt =$.datepicker.formatDate( "M/dd/yy", new Date(pickdate_get));
$(".package_pickup_date").text(pick_date_frmt);

Output::  Jan/17/2020

Tuesday, December 17, 2019

Mail Send auto with auto reply Before date using php mysqli


<!-- Script for mail send next order 1 day before at 10 mrng-->
<?php

date_default_timezone_set('Canada/Eastern');
//$currentDate = '12/19/2019';
$tomorrow = new DateTime('tomorrow');
$currentDate = $tomorrow->format('m/d/Y');
$time_match_nn=date('H A');
 //$time_match_nn='10';
//echo $time_match_nn;

$servername = "localhost";
$username = "xxxxxx";
$password = "xxxxx(*()";
$dbname = "xxxxxxx";
//echo $currentDate;
$conn = new mysqli($servername, $username, $password, $dbname);
    if($conn->connect_error) die($conn->connect_error);

  $remind_query1 = "SELECT * FROM wp_cbg7ccqh4q_package_order WHERE one_delivery_date= '$currentDate' and $time_match_nn='10 AM' and order_status='1' ";
//echo "SELECT * FROM wp_cbg7ccqh4q_package_order WHERE one_delivery_date= '$currentDate' AND $time_match_nn='10'";  
   
if($run1 = $conn->query($remind_query1))
    {
$rows = $run1->num_rows;
     
      for ($j = 0; $j < $rows; ++$j)
      {
      $run1->data_seek($j);
      $row = $run1->fetch_array(MYSQLI_NUM);

      $to = 'xxxx.xxxxxx@gmail.com';
      $too = $row[27];
          $subject = "Next Order Package Reminder";
          $message = "Hi ".$row[1]."\nJust a reminder that your package 1 will on the ".$row[25].",\n"
                  ."Please renew your package\n"."\nThank You"."\nEzboxes";
$messager = "Tomorrow Package deliver\nThank You"."\nEzboxes";
        $headers = "From: info@xxxxxx.ca";
     
  mail($to,$subject,$message,$headers);
  @mail($too,$subject,$messager,$headers);
 
      }

}
?>
<!-- Script for mail send next order 1 day before at 10 mrng-->

Sunday, December 15, 2019

Date format change using php

<?php
$back_date = $row_pack["order_date"];
//$newDateString =Date("F j, Y",$back_date);
echo date('F j, Y', strtotime(str_replace('','/', $back_date)));
#output: Saturday 24th March 2012
?>

Thursday, December 12, 2019

Mail Send with Auto Reply Using Php

<?php
    if(isset($_POST['order_status_val']))
    {
        $to = 'xxx.xxxx@gmail.com';
        $too = $_POST['order_email'];
        $subject = 'Update Order Status';
$message = 'Order Id: '. strip_tags($_POST['order_id']);
        $message1 = 'Order Date Change to : '.strip_tags($_POST['pickup_date_ez']);

        $boundary =md5(date('r', time()));

        $headers = "From: info@xxxx.com";
        $headers .= "\r\nMIME-Version: 1.0\r\nContent-Type: multipart/mixed; boundary=\"_1_$boundary\"";
           $message2="We received your submission. We will contact you soon ...";                                                   
        $message="
$message\n$message1\n";
 mail($to, $subject, $message, $headers);
 @mail($too, $subject, $message2, $headers);
      echo '<script type="text/javascript">alert("Thank you! Your message has been sent.");</script>'; 
    }
?>
<form class="fild_sec_ordr" action="" method="post" id="customer_order_change">
<div class="input-group">
<input type="hidden" class="form-control" name="order_id" value="111111"/>
<input type="hidden" class="form-control" name="order_email" value="abc@gmail.com"/>
<select class="form-control" name="order_status_type">
<option value="">Choose Status</option>
<option value="Delivered">Delivered</option>
<option value="Completed">Completed</option>
<option value="Cancelled">Cancelled</option>
</select>
</div>
<div class="input-group btnsec">
<button type="submit" class="btn btnsubmit" name="customer_order_status">Submit</button>
</div>
</form>

Friday, December 6, 2019

Create custom wordpress plugin

<?php
/**
 * Plugin Name: Package Order List
 * Description: Plugin is creating for display the package order list.
 * Version: 1.0
 * Author: Pardeep kumar
 */
 error_reporting(0);
 function wps_poll_options_page_15() { //Change the 5 with any number as well as replace other 5's which are in this code
    ?>
<style>

   .heading_cls{ background: #898989;
    color: #fff;
    font-size: 13px;
    font-weight: bold;
    text-align: center;}

</style>
<div class="wrap">
<h2 style="text-align: center;padding: 10px;background: cornflowerblue;color: #fff;">Master Table </h2><br>   
<table width="80%" border="1" cellpadding="5" cellspacing="1">
<tr>                     
    <td class="heading_cls">Order Id</td>
        >
          </tr>
<?php
$servername = "localhost";
$username = "dajzrjyb_boxez";
$password = "FGHJ1aa2(*()";
$dbname = "dajzrjyb_ezboxes";

// Create connection
$conn = new mysqli($servername, $username, $password, $dbname);
// Check connection
if ($conn->connect_error) {
    die("Connection failed: " . $conn->connect_error);
}

$sql_package = "SELECT * FROM wp_cbg7ccqh4q_package_order where order_status=1";
$result = $conn->query($sql_package);

if ($result->num_rows > 0) {
    while($row_pack = $result->fetch_assoc()) {
?>

<tr>
    <td><?php echo $row_pack["order_id"]; ?></td>
   
         </tr>
<?php
    }
} else {
    echo "0 results";
}
?>
</table>

</div>
<?php
}
function wps_poll_menu_15 () {
add_menu_page('All Package Order','All Package Order','manage_options','wps_poll_admin_15', 'wps_poll_options_page_15');
}
add_action('admin_menu','wps_poll_menu_15');
?>

Tuesday, December 3, 2019

Google location get using Google API

<input type="text" name="pickup_pick_address" placeholder="Start typing your address" class="form-control" id="pickup_pick_address" />

<script type="text/javascript" src="https://maps.googleapis.com/maps/api/js?key=your_api_here&amp;libraries=places"></script>     
<script>
  google.maps.event.addDomListener(window, 'load', initialize);
    function initialize() {
      var input = document.getElementById('pickup_pick_address');
      var autocomplete = new google.maps.places.Autocomplete(input);
  //for specific location show
/*  autocomplete.setComponentRestrictions({'country': ['CA']}); */
      autocomplete.addListener('place_changed', function () {
      var place = autocomplete.getPlace();
      $('#lat').val(place.geometry['location'].lat());
      $('#long').val(place.geometry['location'].lng());
    });
  }
  </script>

Friday, November 29, 2019

Calendor specific days hide using jquery

<!--script for calendor date hide -->
    <link href="http://www.jquerycookbook.com/demos/css/jquery-ui.css" rel="stylesheet" />
    <script src="http://www.jquerycookbook.com/demos/scripts/jquery-1.11.1.min.js"></script>
    <script src="http://www.jquerycookbook.com/demos/scripts/jquery-ui.min.js"></script>
    <script src="https://code.jquery.com/ui/1.11.4/jquery-ui.js"></script>
  
<script type="text/javascript">
   $(function () {
        var unavailableDay = 2; // disable tuesdays
         var unavailableDay1 = 3; 
         
        function disableDays(date) {        
            var day = date.getDay(); 
            return [(day != unavailableDay && day != unavailableDay1), ""];
           
        }

        $('#datepicker').datepicker({ 
            beforeShowDay: disableDays,
             minDate: '+1',   // date start tomorrow
             maxDate:'+2m'  // next 2month date show
        });

        $("#changeDates").on('click', function () {
            unavailableDay = 3; // disable wednesdays 
            $("#datepicker").datepicker("refresh");
        });
    });
</script>
<!--script for calendor date hide--->

  <input type="text" id="datepicker" />

Thursday, November 28, 2019

Wordpress custom form insert into database table

 <?php

if(isset($_POST['submit'])){
global $wpdb;
$table='wp_cbg7ccqh4q_zipcode';
$post_data=array(
'zipcode_val' => $_POST['zipcode_val']
);
$results =$wpdb->insert( $table, $post_data);
      if($results){
    //   echo 'Zip Code added Successfully';
    $text_zip="ZipCode added Successfully";
echo '<script type="text/javascript">alert("'.$text_zip.'")</script>';
        } else {
        echo 'Not insert';
        }
}

?>
        <form action="" id="location_forms" method="post" autocomplete="off">
    <table>
        <tr>
            <td><label for="organizationname">Add Zip Code:</label></td>
            <td><input type="text" name="zipcode_val" id="zipcode_val" value="" onkeypress="return event.charCode >= 48 && event.charCode <= 57" /> </td>
        </tr>
     
        <tr>
            <td><button type="submit" id="order_loc" class="check-btn" name="submit">Submit</button></td>
        </tr>
    </table>
</form>

Wednesday, November 27, 2019

Form vallidation Script using Jquery

<form id="location_forms" method="post" action="">
  <div>
    <label for="in_location">First Name:</label>
    <input type="text" id="in_location" name="in_location"  onkeypress="return event.charCode >= 48 && event.charCode <= 57"></input>
  </div>
  <div>
    <label for="lname">Last Name:</label>
    <input type="text" id="out_location" name="out_location"  onkeypress="return event.charCode >= 48 && event.charCode <= 57"></input>
  </div>
  <div>
    <label for="user_email">Email:</label>
    <input type="email" id="user_email" name="user_email"></input>
  </div>
  <div>
    <label for="psword">Password:</label>
    <input type="password" id="psword" name="psword"></input>
  </div>
  <div>
    <input type="submit" value="Submit" />
  </div>
</form>
<script src="https://cdnjs.cloudflare.com/ajax/libs/jquery/3.1.1/jquery.min.js"></script>
 <script src="https://cdn.jsdelivr.net/jquery.validation/1.16.0/jquery.validate.min.js"></script>
<script>
$(document).ready(function() {
  $('form[id="location_forms"]').validate({
    rules: {
      in_location: 'required',
      out_location: 'required',
      user_email: {
        required: true,
        email: true,
      },
      psword: {
        required: true,
        minlength: 8,
      }
    },
    messages: {
      in_location: 'This field is required',
      out_location: 'This field is required',
      user_email: 'Enter a valid email',
      psword: {
        minlength: 'Password must be at least 8 characters long'
      }
    },
    submitHandler: function(form) {
      form.submit();
    }
  });

});
</script>

Monday, November 25, 2019

Create shortcode in wordpress

      [my_ad_code]
     
       // The shortcode function
function wpb_demo_shortcode_2() {

// Advertisement code pasted inside a variable
$string .= '<script async src="//pagead2.googlesyndication.com/pagead/js/adsbygoogle.js"></script>
<ins class="adsbygoogle"
     style="display:block; text-align:center;"
     data-ad-format="fluid"
     data-ad-layout="in-article"
     data-ad-client="ca-pub-0123456789101112"
     data-ad-slot="9876543210"></ins>
<script>
     (adsbygoogle = window.adsbygoogle || []).push({});
</script>';

// Ad code returned
return $string;

}
// Register shortcode
add_shortcode('my_ad_code', 'wpb_demo_shortcode_2'); 

Thursday, November 21, 2019

Onclick show hide div

  <!--script for floorpage filter show-->
<script src="https://ajax.googleapis.com/ajax/libs/jquery/3.4.1/jquery.min.js">
<script>
;(function($){
   $(document).ready(function(){
   $(function(){
      $(".fil_buttn").click(function(){
   alert('hiiii');
    $(".more_filt").show(1000);
    $('.more_filt').css({'display':'block !important'});
  });
   });
   });
})(jQuery);
</script>
<!--script for floor page filter show-->

Mail send to email using php mailer

This summary is not available. Please click here to view the post.

Saturday, November 16, 2019

Jquery Auto complete

<!doctype html>
<html lang="en">
<head>
  <meta charset="utf-8">
  <title>autocomplete demo</title>
  <link rel="stylesheet" href="//code.jquery.com/ui/1.12.1/themes/smoothness/jquery-ui.css">
  <script src="//code.jquery.com/jquery-1.12.4.js"></script>
  <script src="//code.jquery.com/ui/1.12.1/jquery-ui.js"></script>
</head>
<body>

<label for="autocomplete">Select a programming language: </label>
<input id="autocomplete">

<script>
$( "#autocomplete" ).autocomplete({
  source: [ "c++", "java", "php", "coldfusion", "javascript", "asp", "ruby" ]
});
</script>

</body>
</html>

Tuesday, November 5, 2019

Pasword update using php mysqli

 <?php
                       /*update profile */
                             include 'connection.php';
                           
                          $email_session = $_SESSION["name"];

if (count($_POST) > 0) {
    $result = mysqli_query($con, "SELECT * from register WHERE email = '".$email_session."' or phone_number = '".$email_session."'");
    $row = mysqli_fetch_array($result);
    if ($_POST["currentPassword"] == $row["password"]) {
        mysqli_query($con, "UPDATE register set password='" . $_POST["newPassword"] . "' WHERE email = '".$email_session."' or phone_number = '".$email_session."'");
        $message = "Password Changed";
    } else
        $message = "Current Password is not correct";
}
                           
                        ?>


 <form name="frmChange" method="post" action="" onSubmit="return validatePassword()">
<div style="width:500px;">
<div class="message"><?php if(isset($message)) { echo $message; } ?></div>
<table border="0" cellpadding="10" cellspacing="0" width="500" align="center" class="tblSaveForm">
<tr class="tableheader">
<td colspan="2">Change Password</td>
</tr>
<tr>
<td width="40%"><label>Current Password</label></td>
<td width="60%"><input type="password" name="currentPassword" class="txtField"/><span id="currentPassword"  class="required"></span></td>
</tr>
<tr>
<td><label>New Password</label></td>
<td><input type="password" name="newPassword" class="txtField"/><span id="newPassword" class="required"></span></td>
</tr>
<td><label>Confirm Password</label></td>
<td><input type="password" name="confirmPassword" class="txtField"/><span id="confirmPassword" class="required"></span></td>
</tr>
<tr>
<td colspan="2"><input type="submit" name="submit" value="Submit" class="btnSubmit"></td>
</tr>
</table>
</div>
</form>

<script>
function validatePassword() {
var currentPassword,newPassword,confirmPassword,output = true;

currentPassword = document.frmChange.currentPassword;
newPassword = document.frmChange.newPassword;
confirmPassword = document.frmChange.confirmPassword;

if(!currentPassword.value) {
currentPassword.focus();
document.getElementById("currentPassword").innerHTML = "required";
output = false;
}
else if(!newPassword.value) {
newPassword.focus();
document.getElementById("newPassword").innerHTML = "required";
output = false;
}
else if(!confirmPassword.value) {
confirmPassword.focus();
document.getElementById("confirmPassword").innerHTML = "required";
output = false;
}
if(newPassword.value != confirmPassword.value) {
newPassword.value="";
confirmPassword.value="";
newPassword.focus();
document.getElementById("confirmPassword").innerHTML = "not same";
output = false;
}
return output;
}
</script>

Friday, November 1, 2019

Button onhold text show and mouse out text hide using jquery

<script
  src="https://code.jquery.com/jquery-2.2.4.min.js"
 
  crossorigin="anonymous"></script
Click and Hold to select. simply click to unselect.<br /><br />
<span class='button'>Click Me</span>

<span id="customeButtonClick" style="display:none;">
I am good.
</span>

<script>

(function () {
    // how many milliseconds is a long press?
    var offset = 5000;

    $(".button").on('mousedown', function (e) {
        // holds the start time
        $(this).data('start', new Date().getTime());
        $(this).addClass("selected");
        $('#customeButtonClick').show();
    }).on('mouseup', function (e) {
        if (new Date().getTime() >= ($(this).data('start') + offset)) {
            //alert('ur click lasted for over 2 secs');
            $(this).addClass("selected");
            $('#customeButtonClick').show();
        } else {
            $(this).removeClass("selected");
            $('#customeButtonClick').hide();
        }
    }).on('mouseleave', function (e) {
        start = 0;
        $(this).removeClass("selected");
        $('#customeButtonClick').hide();
        //you can add destroy lingering functions on mouse leave
    });
}());
</script>

<style>
.button {
    padding:4px;
    background:green;
    border-radius:4px;
    cursor:pointer;
}
.button.selected {
    background:orange;
}
</style>


Click Me

Tuesday, October 29, 2019

Number field type maximum 10 digit using jquery

<input name="phone" id="phone" placeholder="Mobile Number" class="form-control" type="number" required>

 <script src="https://ajax.googleapis.com/ajax/libs/jquery/2.1.1/jquery.min.js"></script>
<script>
$("#phone").keydown(function(event) {
  k = event.which;
  if ((k >= 96 && k <= 105) || k == 8) {
    if ($(this).val().length == 10) {
      if (k == 8) {
        return true;
      } else {
        event.preventDefault();
        return false;

      }
    }
  } else {
    event.preventDefault();
    return false;
  }

});
</script>

Time show in drop down using jquery


                 <input type="text" id="time_get" class="time_get" name="time_get" placeholder="Choose Time Slot">
              <script>
  $(document).ready(function(){
   var time = new Date();
 var current_time_ab = time.toLocaleString('en-US', { hour: 'numeric', hour12: true });
   $('.time_get').timepicker({
    timeFormat: 'hh p',
    interval: 60,
    minTime: current_time_ab,
    maxTime: '6:00pm',
    defaultTime: 'Choose Time Slot',
    startTime: current_time_ab,
    dynamic: false,
    dropdown: true,
    scrollbar: true
});
});

  </script>
  <link rel="stylesheet" href="http://cdnjs.cloudflare.com/ajax/libs/timepicker/1.3.5/jquery.timepicker.min.css">

<script src="https://cdnjs.cloudflare.com/ajax/libs/timepicker/1.3.5/jquery.timepicker.min.js"></script>

Thursday, October 24, 2019

Form attachment send to Email using php


 <?php
    if(isset($_POST['submit_btn']))
    {
     
   
      $to = 'info@abc.com';
        //$to = 'pardeep@gmail.com';
        $subject = $_POST['ur_name'].' - Subject here';

        $message = 'Product Name: '. strip_tags($_POST['product_name']);
        $message1 = 'Product Color: '.strip_tags($_POST['product_color']);
        $message2 = 'Imprint Color: '.strip_tags($_POST['imprint_color']);
       // $message = strip_tags($_POST['upload_logo']);
        $message3 = 'Name: '.strip_tags($_POST['ur_name']);
        $message4 ='Email: '. strip_tags($_POST['ur_email']);
        $message5 = 'Company Name: '.strip_tags($_POST['company_name']);
        $message6 = 'Phone Number: '.strip_tags($_POST['phone_number']);
        $message7 = 'Comment: '.strip_tags($_POST['coment']);
        $attachment = chunk_split(base64_encode(file_get_contents($_FILES['upload_logo']['tmp_name'])));
        $filename = $_FILES['upload_logo']['name'];


        $boundary =md5(date('r', time()));

        $headers = "From: info@bodimasta.com.au";
        $headers .= "\r\nMIME-Version: 1.0\r\nContent-Type: multipart/mixed; boundary=\"_1_$boundary\"";
                                                               
        $message="This is a multi-part message in MIME format.

--_1_$boundary
Content-Type: multipart/alternative; boundary=\"_2_$boundary\"

--_2_$boundary
Content-Type: text/plain; charset=\"iso-8859-1\"
Content-Transfer-Encoding: 7bit

$message\n$message1\n$message2\n$message3\n$message4\n$message5\n$message6\n$message7\n

--_2_$boundary--
--_1_$boundary
Content-Type: application/octet-stream; name=\"$filename\"
Content-Transfer-Encoding: base64
Content-Disposition: attachment

$attachment
--_1_$boundary--";

        mail($to, $subject, $message, $headers);
     
         echo '<script type="text/javascript">alert("Thank you! Your message has been sent.");</script>';
    }
?>


<form action="" method="post" class="tbldesigns" name="artwork_mockup" enctype="multipart/form-data">
<div class="main1">
<div class="container_drsc">
<div class="row">
<div class="col-md-12 col-sm-12 col-xs-12">
<div class="form-group">
<label class="col-sm-12 titleserd">Product</label>
</div>
<div class="form-group">
<label class="col-sm-2 control-label"> Name</label>
<div class="col-sm-10 col-xs-12">
<input type="text" id="pjCF_field_229" name="product_name" value="" required size="30" class="form-control pjCF-form-field pjCF-checked-field" placeholder="">
</div>
</div>
<div class="form-group">
<label class="col-sm-2 control-label"> Product Color</label>
<div class="col-sm-10 col-xs-12">
<input type="text" id="pjCF_field_229" name="product_color" value="" size="30" class="form-control pjCF-form-field pjCF-checked-field" placeholder="" required>
</div>
</div>
<div class="form-group">
<label class="col-sm-2 control-label"> Color</label>
<div class="col-sm-10 col-xs-12">
<input type="text" id="pjCF_field_229" name="imprint_color" value="" size="30" class="form-control pjCF-form-field pjCF-checked-field" placeholder="">
</div>
</div>

</div>
</div>
</div>

<div class="container_drsc">
<div class="row">
<div class="col-md-12 col-sm-12 col-xs-12">
<div class="form-group">
<label class="col-sm-12 titleserd">Upload Logo</label>
</div>
<div class="form-group">
<div class="wide- fileupload-cover field-cover">
          <label class="col-sm-2 control-label">Attach Your Logo</label>
  <div class="col-sm-10 col-xs-12">
<div class="acd">
</div-->
<input class="filuplod" type="file" data-name-list="field15" name="upload_logo">
</div>
</div>
</div>
</div>
</div>
</div>
</div>

<div class="container_drsc">
<div class="row">
<div class="col-md-12 col-sm-12 col-xs-12">
<div class="form-group">
<label class="col-sm-12 cf-heading cf-heading-medium titleserd"> Your Contact Details</label>
</div>
<div class="form-group">
<label class="col-sm-2 control-label">Name</label>
<div class="col-sm-10 col-xs-12">
<div class="input-group">
<span class="input-group-addon"><i class="glyphicon glyphicon-user"> </i></span>
<input id="name" type="text" class="form-control" name="ur_name" placeholder="Name" required>
</div>
</div>
</div>
<div class="form-group">
<label class="col-sm-2 control-label">Email</label>
<div class="col-sm-10 col-xs-12">
<div class="input-group">
<span class="input-group-addon"><i class="glyphicon glyphicon-envelope"> </i></span>
<input id="email" type="text" class="form-control" name="ur_email" placeholder="Email" required>
</div>
</div>
</div>
<div class="form-group">
<label class="col-sm-2 control-label">Company Name</label>
<div class="col-sm-10 col-xs-12">
<div class="input-group">
<span class="input-group-addon"><i class="glyphicon glyphicon-lock"> </i></span>
<input id="company name" type="text" class="form-control" name="company_name" placeholder="Company Name">
</div>
</div>
</div>
<div class="form-group">
<label class="col-sm-2 control-label">Phone Number</label>
<div class="col-sm-10 col-xs-12">
<div class="input-group">
<span class="input-group-addon"><i class="glyphicon glyphicon-earphone"> </i></span>
<input id="phone number" type="text" class="form-control" name="phone_number" placeholder="Phone Number" required>
</div>
</div>
</div>
<div class="form-group">
<label class="col-sm-2 control-label">Comments</label>
<div class="col-sm-10 col-xs-12">
<div class="input-group1">

<textarea rows="4" cols="70" class="form-control" name="coment" Placeholder="Comments...."></textarea>
</div>
</div>
</div>
</div>
<div class="col-sm-12 bthsd text-center">
<button type="submit" class="submit_btn" value="Submit Form" name="submit_btn"> Submit </button>
</div>

</div>
</div>
</div>
</div>

   </div>
         </form>

One dropdown select another dropdown value Change

<script src="http://ajax.googleapis.com/ajax/libs/jquery/2.0.0/jquery.min.js"></script>
<script language="javascript" type="text/javascript"> 
$(document).ready(function(){

var chocolates = [
{display: "Dark chocolate", value: "dark-chocolate" },
{display: "Milk chocolate", value: "milk-chocolate" },
{display: "White chocolate", value: "white-chocolate" },
{display: "Gianduja chocolate", value: "gianduja-chocolate" }];

var vegetables = [
{display: "Broccoli", value: "broccoli" },
{display: "Cabbage", value: "cabbage" },
{display: "Carrot", value: "carrot" },
{display: "Cauliflower", value: "cauliflower" }];

var icecreams = [
{display: "Frozen yogurt", value: "frozen-yogurt" },
{display: "Booza", value: "booza" },
{display: "Frozen yogurt", value: "frozen-yogurt" },
{display: "Ice milk", value: "ice-milk" }];

$("#indiavisatype").change(function() {
var parent = $(this).val();

switch(parent){
  case 'chocolates':
list(chocolates);
break;
  case 'vegetables':
list(vegetables);
break;
  case 'icecreams':
list(icecreams);
break;
default:
$("#indiavisatime").html('');
break;
   }
});


function list(array_list)
{
$("#indiavisatime").html("");
$(array_list).each(function (i) {
$("#indiavisatime").append("<option value=\""+array_list[i].value+"\">"+array_list[i].display+"</option>");
});
}

});
</script>


<div class="wrapper">
Category : <select name="parent_selection" id="indiavisatype">
    <option value="">-- Please Select --</option>
    <option value="chocolates">Chocolates</option>
    <option value="vegetables">Vegetables</option>
    <option value="icecreams">Ice cream</option>
</select>
<select name="child_selection" id="indiavisatime">
</select>
</div>

Thursday, October 17, 2019

How to create PHP based email form with file attachment

 <?php
    if(isset($_POST['submit']))
    {
        //The form has been submitted, prep a nice thank you message
        $output = '<h1>Thanks for your file and message!</h1>';
        //Set the form flag to no display (cheap way!)
        $flags = 'style="display:none;"';

        //Deal with the email
        $to = 'iww.pardeep@gmail.com';
        $subject = 'a file for you';

        $message = strip_tags($_POST['message']);
        $attachment = chunk_split(base64_encode(file_get_contents($_FILES['file']['tmp_name'])));
        $filename = $_FILES['file']['name'];

        $boundary =md5(date('r', time()));

        $headers = "From: webmaster@example.com\r\nReply-To: webmaster@example.com";
        $headers .= "\r\nMIME-Version: 1.0\r\nContent-Type: multipart/mixed; boundary=\"_1_$boundary\"";

        $message="This is a multi-part message in MIME format.

--_1_$boundary
Content-Type: multipart/alternative; boundary=\"_2_$boundary\"

--_2_$boundary
Content-Type: text/plain; charset=\"iso-8859-1\"
Content-Transfer-Encoding: 7bit

$message

--_2_$boundary--
--_1_$boundary
Content-Type: application/octet-stream; name=\"$filename\"
Content-Transfer-Encoding: base64
Content-Disposition: attachment

$attachment
--_1_$boundary--";

        mail($to, $subject, $message, $headers);
    }
?>


<form enctype="multipart/form-data" action="<?php echo $_SERVER['PHP_SELF'];?>" method="post" <?php echo $flags;?>>
<p><label for="message">Message</label> <textarea name="message" id="message" cols="20" rows="8"></textarea></p>
<p><label for="file">File</label> <input type="file" name="file" id="file"></p>
<p><input type="submit" name="submit" id="submit" value="send"></p>
</form>
    

Friday, October 11, 2019

Current time reduce10 minute jquery script

<script>
var dt = new Date();
dt.setMinutes( dt.getMinutes() - 10 );
document.write( dt );
</script>

Thursday, October 10, 2019

Single product page add custom file call in cart page woocommercewordpress

/* single product price pass to checkout*/

add_filter('woocommerce_add_cart_item_data','wdm_add_item_data',3,10);
function wdm_add_item_data($cart_item_data, $product_id) {

    global $woocommerce;
    $new_value = array();
    $new_value['_custom_options'] = $_POST['total_price_new'];
   // $new_value['_custom_options'] = $_POST['total_price_new'];
    $new_value1=$new_value['_custom_options']; //our price
    //print_r($new_value1);die('jjjjj');
    global $new_value1;
    /*echo "<pre>";
    print_r($cart_item_data);
    print_r($new_value);
    print_r($_POST); die('grgrge');
*/
    if(empty($cart_item_data)) {
        return $new_value;
    } else {
        return array_merge($cart_item_data, $new_value);
    }
      }


      Add this function in function.php file

add_action( 'woocommerce_before_calculate_totals', 'update_custom_price' );
function update_custom_price( $cart_object ) {
    foreach ( $cart_object->cart_contents as $cart_item_key => $value ) {
        // Version 2.x
        //$value['data']->price = $value['_custom_options']['custom_price'];
        // Version 3.x / 4.x
        //$value['data']->set_price($value['_custom_options']['total_price_new']);
        $value['data']->set_price($value['_custom_options']);
    }
}      
   
   
  add_filter('woocommerce_cart_item_name','add_usr_custom_session',1,3); 
function add_usr_custom_session($product_name, $values, $cart_item_key ) {  
    $return_string = $product_name. "<br />" ."Start Date: " . $values['date_start']. "<br />" ."End Date: ". $values['date_end']. "<br />" ."Adult: ". $values['adult_count']. "<br />" ."Child with Bed: ". $values['adultbed_count']. "<br />" ."Child Without Bed: ". $values['adultwithoutbed_count'];// . "<br />" . print_r($values['_custom_options']);
    return $return_string;  

}  
    

How to add WooCommerce custom cart item data

Adding cart item data programmatically

As part of this, we’ll look at adding custom fields to WooCommerce products. You can also find further information in this detailed tutorial here on WooCommerce custom fields.
In this article, we’ll concentrate on adding meta data from a single field, all the way from the product page to the new order email.
In total, we’ll cover the following:

Add a custom field to the product page

Let’s say that we are running an online printing business and we’re offering customers the chance to have their name printed on one of our posters.
WooCommerce add custom cart item data using woocommerce_add_cart_item_data
To achieve this, we’ll need to add a text field on the product page where the user will be able to enter their name.

<?php

/**

* Add a custom text input field to the product page

*/

function plugin_republic_add_text_field() { ?>

<div class="pr-field-wrap">

<label for="pr-field"><?php _e( 'Your name', 'plugin-republic' ); ?></label>

<input type="text" name='pr-field' id='pr-field' value=''>

</div>

<?php }

add_action( 'woocommerce_before_add_to_cart_button', 'plugin_republic_add_text_field' );
Note that we are inserting our field using an action – woocommerce_before_add_to_cart_button. As you might guess from its name, this action is triggered just before the ‘Add to Cart’ button is displayed on the product page.
If you’re wondering what this means, here’s a brief explanation of actions and filters in WordPress.

Understanding hooks, actions and filters

Hooks are WordPress’s way of allowing you, the developer, to insert your own code into WordPress code. WooCommerce contains hundreds of places that you can hook into, making it a really flexible plugin to extend with custom functionality.
There are two types of hook: actions and filters. Actions are convenient ways to add functionality; filters are a way of modifying content.
We’ll look at both types of hook during this article but, for now, it’s enough to know that hooks are a way of inserting your own functionality into a plugin like WooCommerce or to WordPress itself.

The woocommerce_before_add_to_cart_button action

Take a look at the WooCommerce template file for a simple product:

<?php

/**

* Simple product add to cart

*

* This template can be overridden by copying it to yourtheme/woocommerce/single-product/add-to-cart/simple.php.

*

* HOWEVER, on occasion WooCommerce will need to update template files and you

* (the theme developer) will need to copy the new files to your theme to

* maintain compatibility. We try to do this as little as possible, but it does

* happen. When this occurs the version of the template file will be bumped and

* the readme will list any important changes.

*

* @see https://docs.woocommerce.com/document/template-structure/

* @package WooCommerce/Templates

* @version 3.4.0

*/


defined( 'ABSPATH' ) || exit;


global $product;


if ( ! $product->is_purchasable() ) {

return;

}


echo wc_get_stock_html( $product ); // WPCS: XSS ok.


if ( $product->is_in_stock() ) : ?>


<?php do_action( 'woocommerce_before_add_to_cart_form' ); ?>


<form class="cart" action="<?php echo esc_url( apply_filters( 'woocommerce_add_to_cart_form_action', $product->get_permalink() ) ); ?>" method="post" enctype='multipart/form-data'>

<?php do_action( 'woocommerce_before_add_to_cart_button' ); ?>


<?php

do_action( 'woocommerce_before_add_to_cart_quantity' );


woocommerce_quantity_input( array(

'min_value' => apply_filters( 'woocommerce_quantity_input_min', $product->get_min_purchase_quantity(), $product ),

'max_value' => apply_filters( 'woocommerce_quantity_input_max', $product->get_max_purchase_quantity(), $product ),

'input_value' => isset( $_POST['quantity'] ) ? wc_stock_amount( wp_unslash( $_POST['quantity'] ) ) : $product->get_min_purchase_quantity(), // WPCS: CSRF ok, input var ok.

) );


do_action( 'woocommerce_after_add_to_cart_quantity' );

?>


<button type="submit" name="add-to-cart" value="<?php echo esc_attr( $product->get_id() ); ?>" class="single_add_to_cart_button button alt"><?php echo esc_html( $product->single_add_to_cart_text() ); ?></button>


<?php do_action( 'woocommerce_after_add_to_cart_button' ); ?>

</form>


<?php do_action( 'woocommerce_after_add_to_cart_form' ); ?>


<?php endif; ?>
view rawsimple.php hosted with ❤ by GitHub
If you look at line 33, you can see the woocommerce_before_add_to_cart_button, just before the code to display the quantity field and the Add to Cart button.

Add a custom field after the Add to Cart button

If we wanted to change our field’s position so that it appears after the Add to Cart button, we can replace the woocommerce_before_add_to_cart_button action with woocommerce_after_add_to_cart_button.
Note that both these hooks appear within the <form> element. This is important for us when we’re adding the custom field value to the cart object.

Validating the custom field data

So far so good, hopefully. Now let’s look at what happens when the customer clicks the Add to Cart button.
When the users clicks Add to Cart, the data from the product form is submitted to the server. This data would normally include things like the product ID and the quantity but, because we’ve added our field, it will also submit the field’s value as custom data.
All this data is passed through a couple of WooCommerce hooks, which allows us to check our field’s content, then add it to the order.

Validating custom field data with woocommerce_add_to_cart_validation

Let’s say that we require the customer to enter their name in the custom field – otherwise they won’t be able to add the product to the cart.
We can enforce this by using validation – that is, we check the value of the custom field when the product is added to the cart. If it’s empty, then we fail validation. We do this using the woocommerce_add_to_cart_validation hook.
Earlier on, we talked about two types of hook – filters and actions. The woocommerce_add_to_cart_validation hook is a filter: it’s passed a parameter, which we can modify if we want, before that parameter is passed back.
In the case of woocommerce_add_to_cart_validation, the parameter is called $passed, and it can be either true or false. If it’s passed back as true, then the product will be added to the cart and we can move on to the next step. But if it’s passed back as false, the product won’t be added to the cart and we can display an error message.
Here’s our validation function:

<?php

/**

* Validate our custom text input field value

*/

function plugin_republic_add_to_cart_validation( $passed, $product_id, $quantity, $variation_id=null ) {

if( empty( $_POST['pr-field'] ) ) {

$passed = false;

wc_add_notice( __( 'Your name is a required field.', 'plugin-republic' ), 'error' );

}

return $passed;

}

add_filter( 'woocommerce_add_to_cart_validation', 'plugin_republic_add_to_cart_validation', 10, 4 );
Okay, there are a few things to note here:

woocommerce_add_to_cart_validation parameters

We are passing 4 parameters in total to our custom validation function:
  • $passed – this is a boolean (true/false) value which is used to decide whether the product has passed validation or not
  • $product_id – the ID of the product
  • $quantity – this is the quantity
  • $variation_id – this parameter will only have a value if we’re on a variable product

Using the $_POST object in validation

When the Add to Cart button is submitted, all the form data is sent to the server and collected by the $_POST object.
This means that we can look in the $_POST object for our custom field value. So, the function checks to see if the field called pr-field is empty. If it is, we change the value of $passed to false.

Adding a notice when validation fails

If the custom field is empty and validation is going to fail, we should probably add a nice message to the user telling them what’s wrong. We can do that using the wc_add_notice function.
The first parameter is the error message that will display; the second parameter is the type of message.

Returning the $passed parameter

Finally, because woocommerce_add_to_cart_validation is a filter, we need to return the $passed parameter. If validation has passed, the value of $passed won’t have changed. But if validation has failed because the user didn’t enter their name, then the value of $passed will be false.
WooCommerce product failed validation using woocommerce_add_to_cart_validation

Adding the custom field data in WooCommerce

Now we’re getting down to the main business – how to add the WooCommerce custom cart meta data.
If the product has passed validation, we want to add the custom field data to the cart meta data. Once it’s in the cart meta data, we can then use it at checkout and in the order once it’s placed.

The woocommerce_add_cart_item_data filter

We’re using woocommerce_add_cart_item_data, another filter, to add the custom cart item data. Take a look at the following function:

<?php

/**

* Add custom cart item data

*/

function plugin_republic_add_cart_item_data( $cart_item_data, $product_id, $variation_id ) {

if( isset( $_POST['pr-field'] ) ) {

$cart_item_data['pr_field'] = sanitize_text_field( $_POST['pr-field'] );

}

return $cart_item_data;

}

add_filter( 'woocommerce_add_cart_item_data', 'plugin_republic_add_cart_item_data', 10, 3 );
This time, the woocommerce_add_cart_item_data passes $cart_item_data, which is an array of data for each item in the cart. We can add our data to this array then pass it back to WooCommerce.
Notice again that we’re using the $_POST object to collect our custom data. We also use sanitize_text_field to sanitise the user input. We add our sanitised data to the $cart_item_data array. We’re going to be able to use that later.

Purchasing the same product multiple times

What happens if your customer wants to buy two items – one with their name, the other with a friend’s name?
WooCommerce will realise that the custom data is different in each case and will create separate line items in the cart.
On the other hand, if your customer adds the same product with the same custom text twice, WooCommerce will display them as a single line item with a quantity of 2.

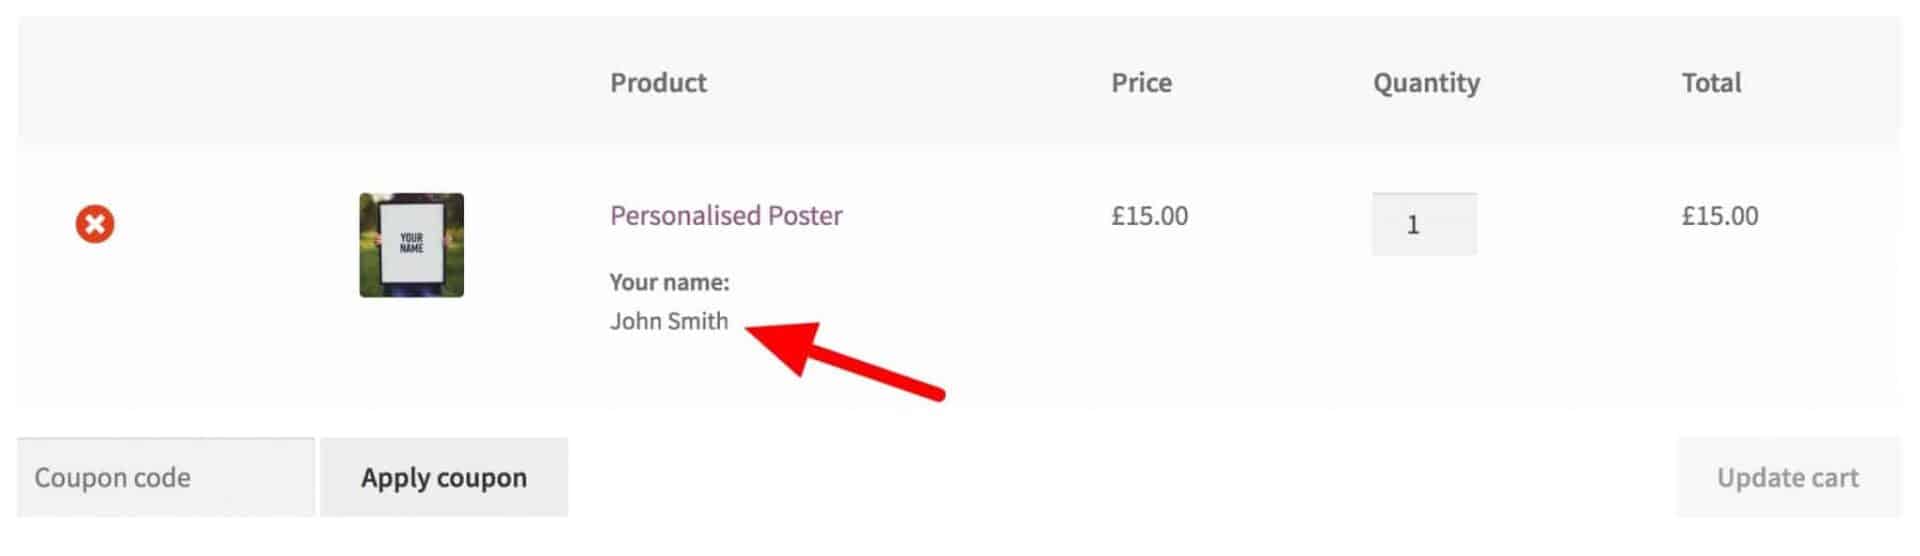
Display the custom WooCommerce meta data in the cart

With our custom meta data successfully stored in the $cart_item_data object, we can display it in the cart.
Custom WooCommerce meta data in the cart

The woocommerce_get_item_data filter

To display the custom data in the cart, we’re going to use another filter, this time the woocommerce_get_item_data filter. You can see it in the following function:

<?php

/**

* Display custom item data in the cart

*/

function plugin_republic_get_item_data( $item_data, $cart_item_data ) {

if( isset( $cart_item_data['pr_field'] ) ) {

$item_data[] = array(

'key' => __( 'Your name', 'plugin-republic' ),

'value' => wc_clean( $cart_item_data['pr_field'] )

);

}

return $item_data;

}

add_filter( 'woocommerce_get_item_data', 'plugin_republic_get_item_data', 10, 2 );
Here we see a parameter, $item_data, where we store data for each line item in the cart. The second parameter is $cart_item_data, where we’ve already stored our custom field value.
So all we need to do is transfer the custom field value from the $cart_item_data array to the $item_data array. We format it slightly differently, assigning the label we want to use in the cart to the ‘key’ element. Then the value of the field itself is assigned to the ‘value’ element.

Updating existing cart meta

The above works perfectly when the customer is adding a new product to the cart. But what about updating custom meta data for an item that is already in the cart? To do that, you need to take a look at this article on updating existing WooCommerce cart meta data.

Add the custom cart meta data to the WooCommerce order

Custom meta data is only really going to be useful for us if we can retrieve it from the order.
To help us with this, we use an action called woocommerce_checkout_create_order_line_item which allows us to update line items as they’re saved to the order.
Note that this is an action, not a filter, as it doesn’t return a value.

<?php

/**

* Add custom meta to order

*/

function plugin_republic_checkout_create_order_line_item( $item, $cart_item_key, $values, $order ) {

if( isset( $values['pr_field'] ) ) {

$item->add_meta_data(

__( 'Your name', 'plugin-republic' ),

$values['pr_field'],

true

);

}

}

add_action( 'woocommerce_checkout_create_order_line_item', 'plugin_republic_checkout_create_order_line_item', 10, 4 );
Again, this allows you to set a label – the first parameter passed to add_meta_data – then add the value of the custom field. The $values parameter is product data from the cart. We check that to see if our custom field has been set and, if it has, we pass the value to the $item array to be saved in the order meta.

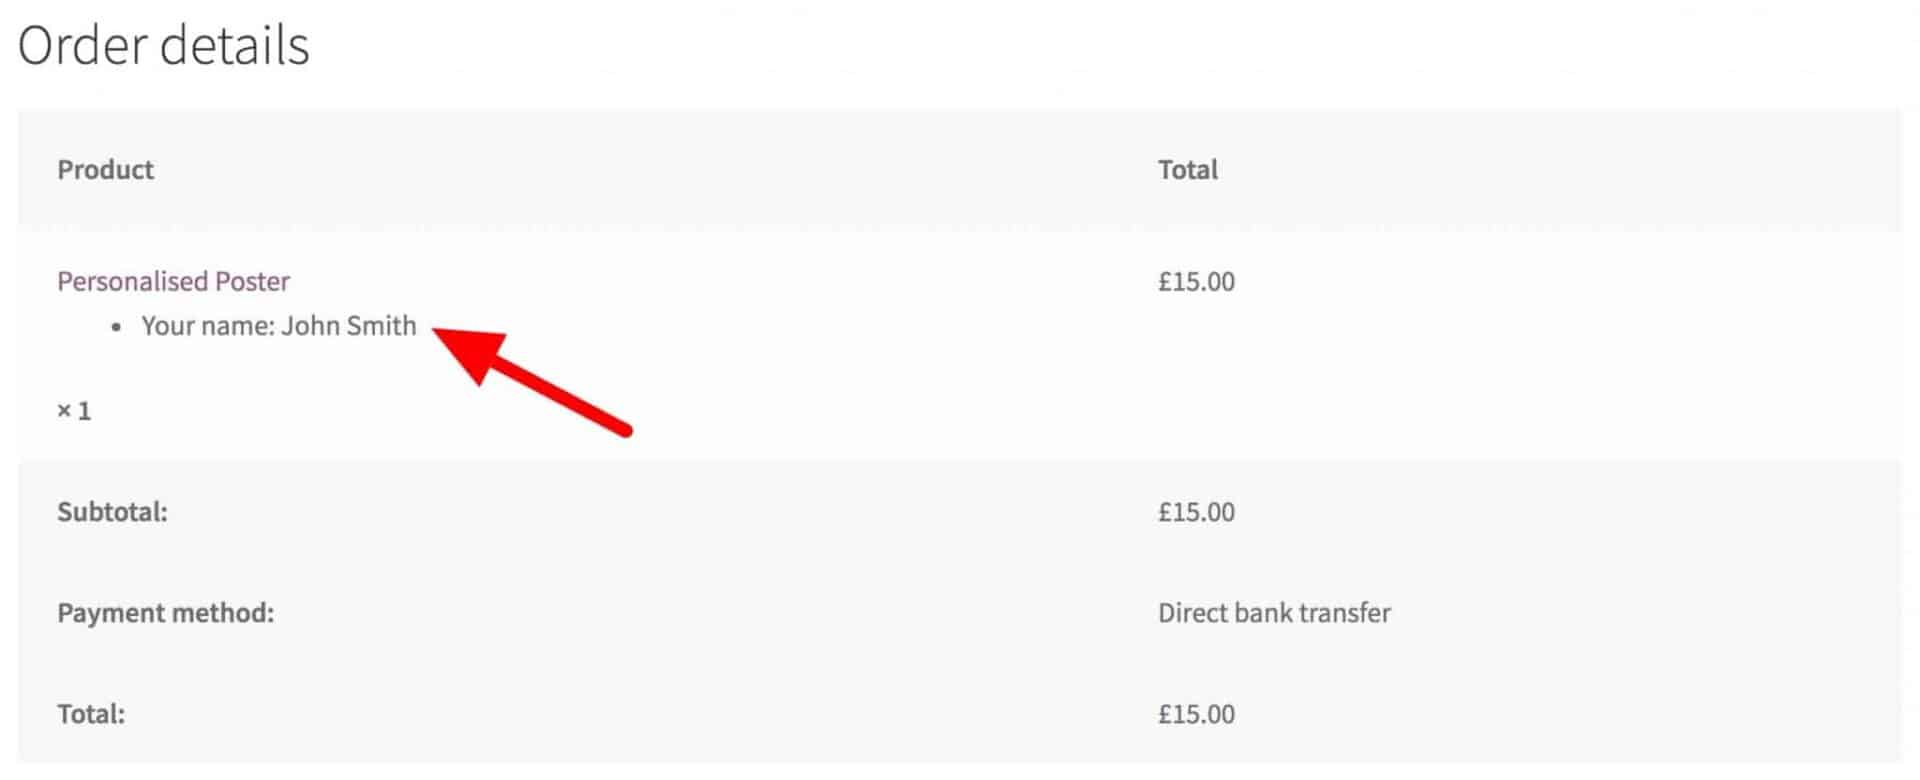
Viewing custom meta data on the order review page

You can see how this is displayed on the order review page after the user has checked out.
WooCommerce custom meta data order received page

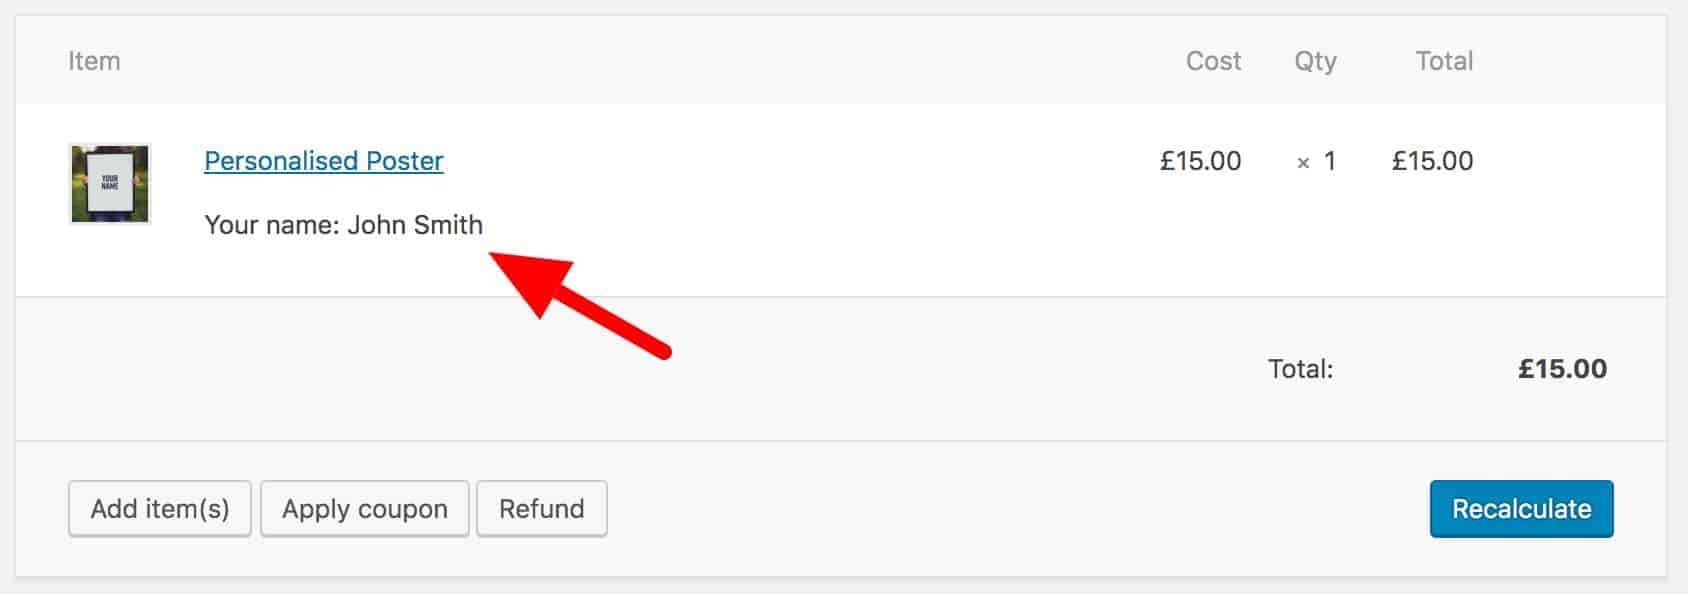
Viewing custom meta data in the order admin page

The function above also ensures that the custom meta data is displayed on the order page in the admin.
Custom meta data in WooCommerce order screen admin

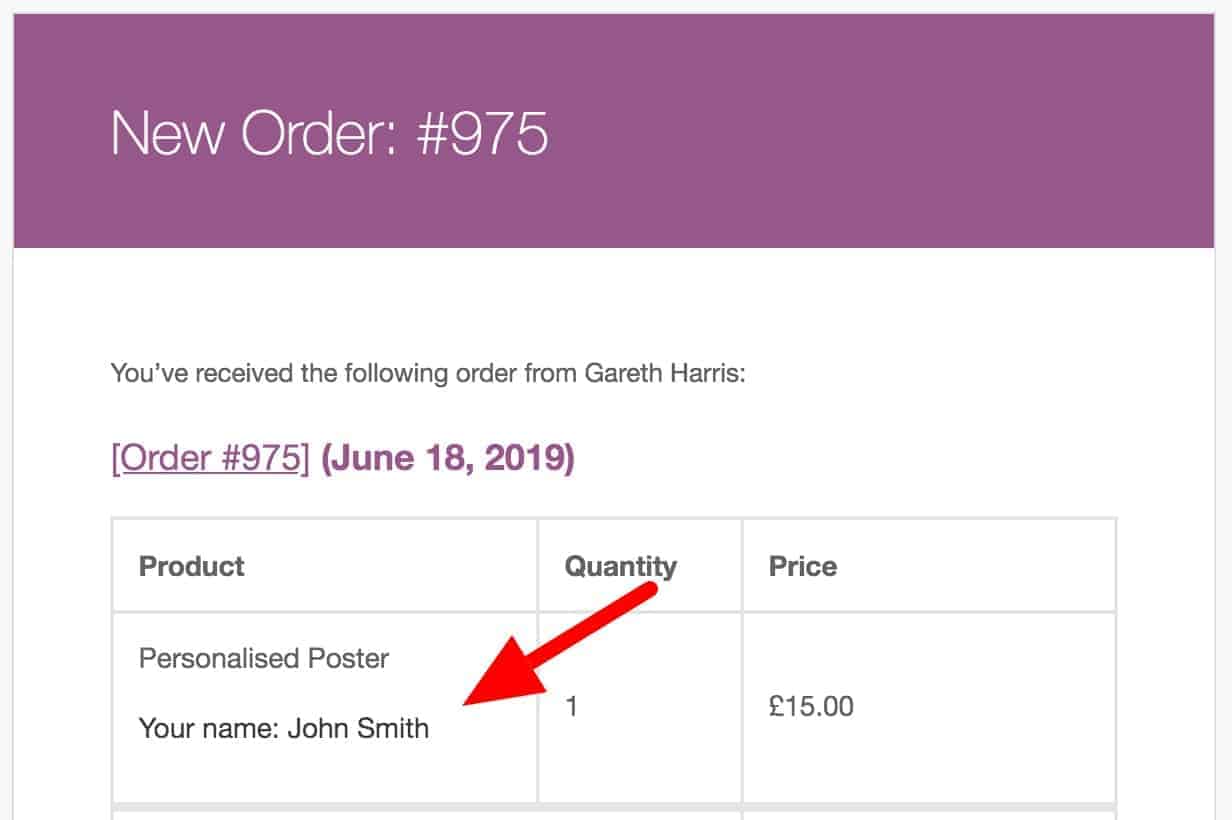
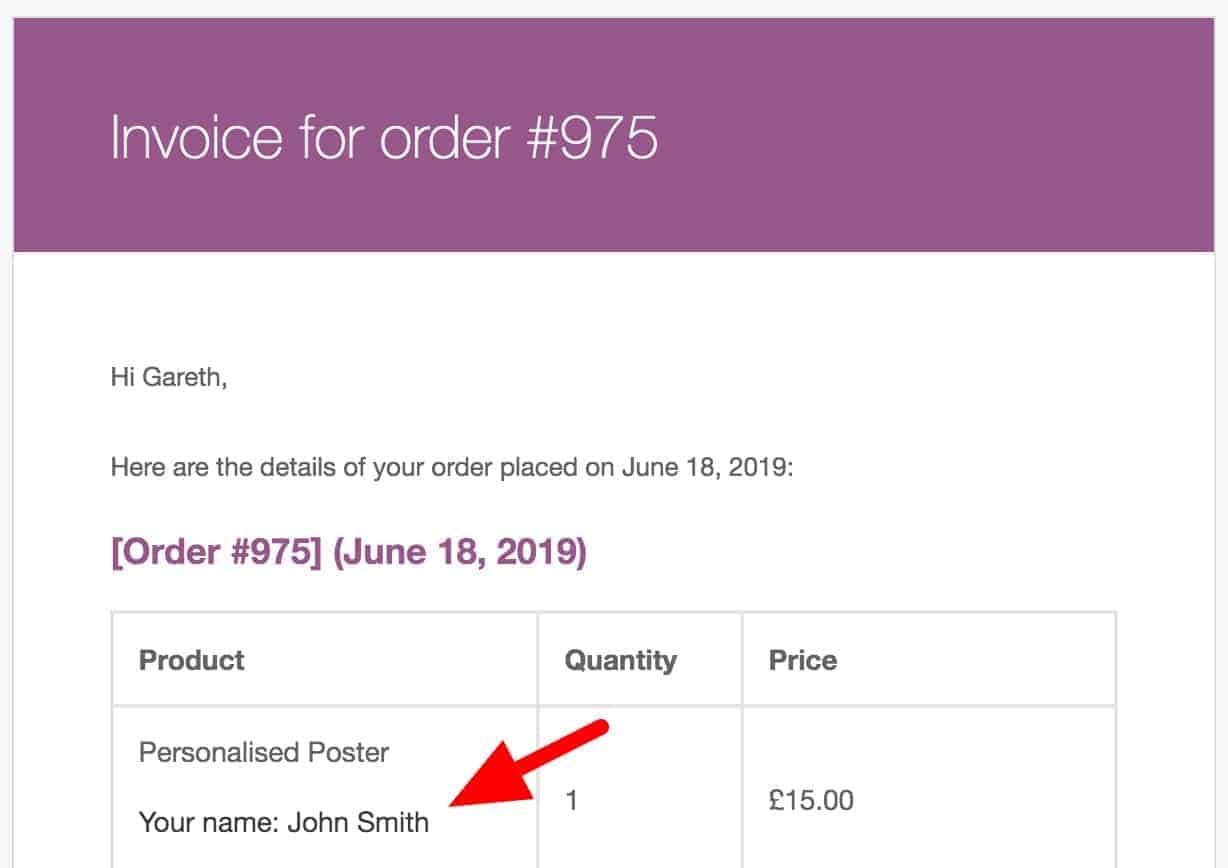
Adding WooCommerce custom meta data to emails

Finally, you will probably want to add your custom meta data to the emails that get sent to you as the admin receiving the order, and to the customer as a record of their order.
To do this, we filter the name of the product as it appears in the line items in the email. We add our custom field values:

<?php

/**

* Add custom cart item data to emails

*/

function plugin_republic_order_item_name( $product_name, $item ) {

if( isset( $item['pr_field'] ) ) {

$product_name .= sprintf(

'<ul><li>%s: %s</li></ul>',

__( 'Your name', 'plugin_republic' ),

esc_html( $item['pr_field'] )

);

}

return $product_name;

}


add_filter( 'woocommerce_order_item_name', 'plugin_republic_order_item_name', 10, 2 );
There are two parameters – the first is the HTML for the product name, the second is the data for the line item. We check the line data for our custom field and, if it exists, we append it to the product name.
Admin order email
Customer email
In that way, you’ve easily added your custom field data to the email.

Programmatically adding custom meta data to the cart in WooCommerce – recap

Okay, hopefully you’ve now got everything you need to know about how to add custom data to the WooCommerce cart.
I’m now going to show you a way that you can get all this done in only a few seconds.

Add WooCommerce custom cart item data using a plugin

There are a couple of big reasons why you might prefer to use a plugin to add custom meta data:
  • Maybe you’re not a developer and you’re not comfortable working with code
  • Even if you are a developer, you could be short of time – so using a ready-made plugin makes sense
  • And, the main one, whether you are a developer or not, a plugin will contain multiple features that you just don’t have time to create
I’m going to step through adding a custom text field for the same product above, but this time using a plugin.
We’ll look at all the extra features that are available, just with the text field alone, but remember that the plugin has at least another 12 field types, plus multiple other features. Find out more about the Product Add-Ons Ultimate plugin here, or read on for steps to add a text field.
WooCommerce custom product add-ons plugin

Adding a text field using a plugin

Let’s assume you’ve got the Product Add-Ons plugin installed and set up. If you need some guidance on getting started, you can check out the documentation.
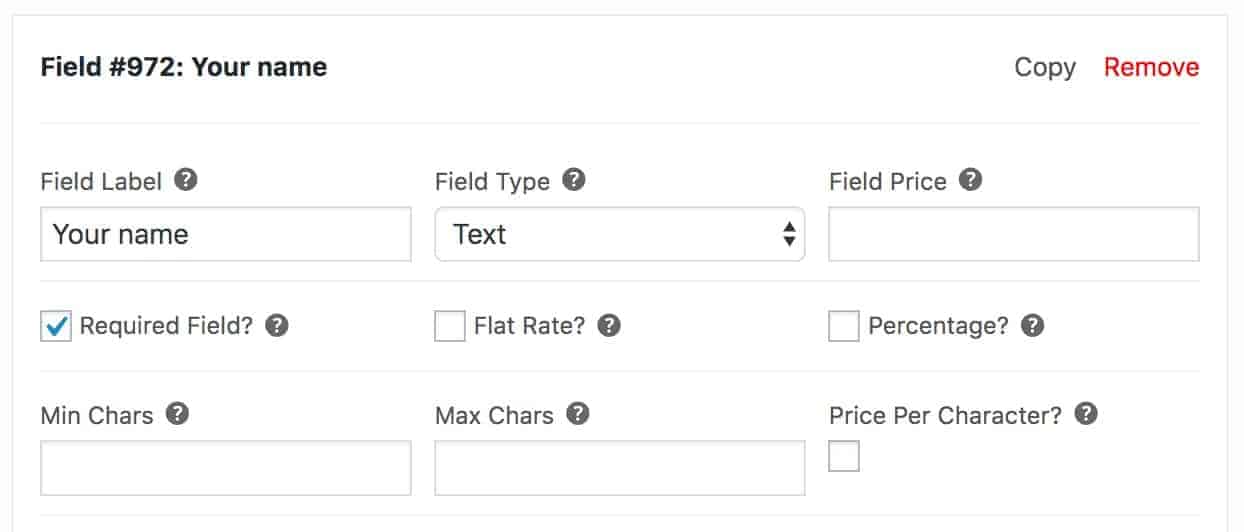
Add your custom field by editing your product, then clicking Product Add-Ons in the Product data section.
WooCommerce Product Add Ons Ultimate panel
Click Add Group then Add Field and set your parameters like the image below:
That’s it. In less than a minute, you can achieve exactly the same result as all the code in the first part of this article.
So that’s the time-saving and technical aspects covered. Let’s look at some of the extra features you get from the Add-Ons Ultimate plugin.

Text field extra options

Please note that many of these extra settings are available to other field types as well. We’re just concentrating on the text field as part of this article.

Adding a price to custom meta data

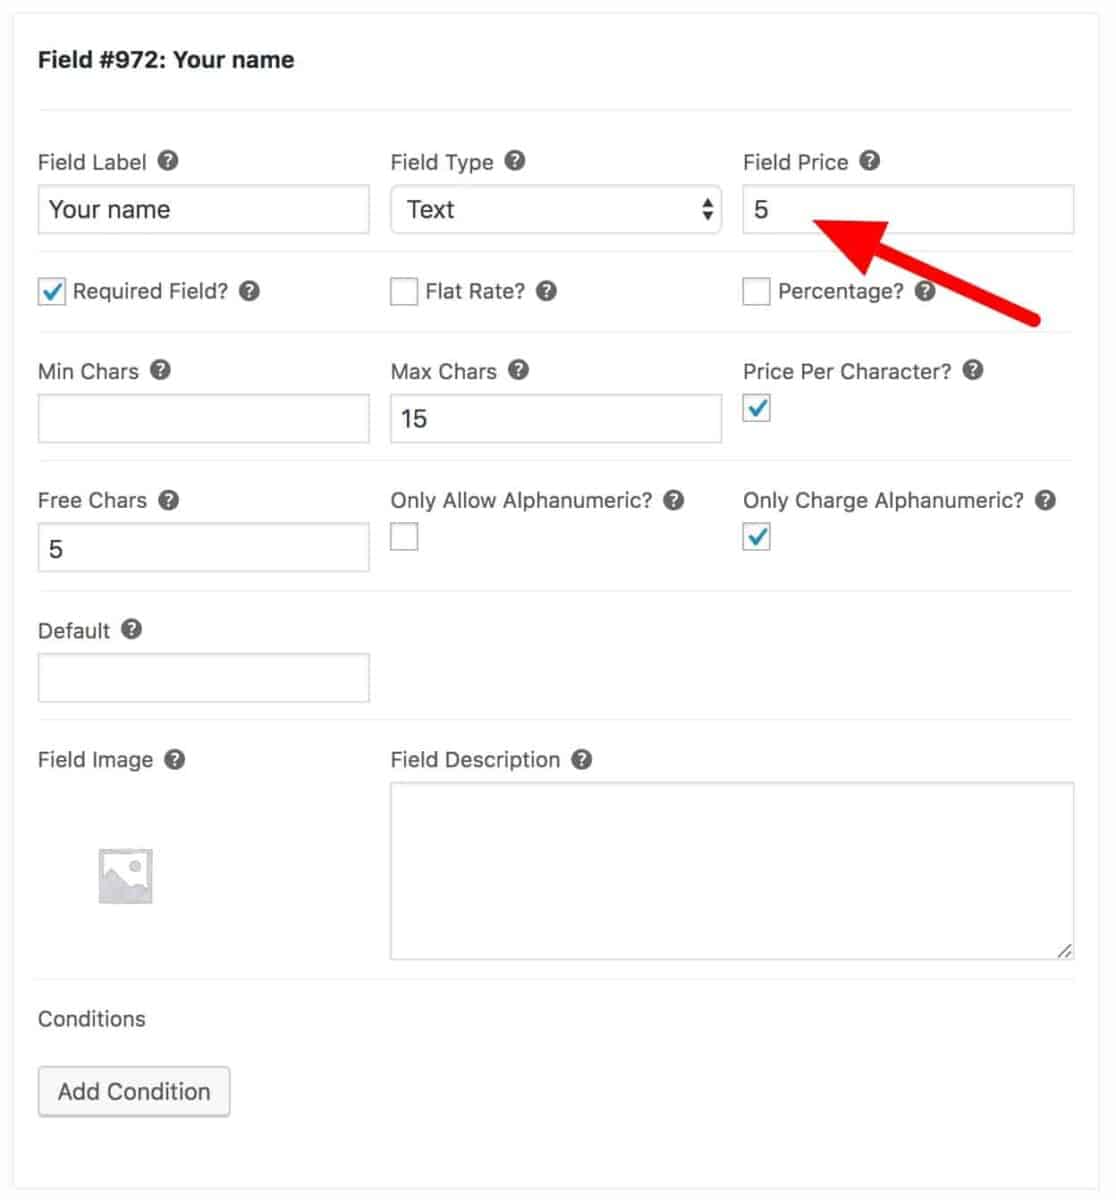
One of the biggest things you might want to do is to assign a price to your custom meta data field. So if the customer enters their name, an extra cost will get added to the product price.
To do this – just enter the additional price in the ‘Field Price’ field. This will get added to the product price when the user enters a value in the field.
Field price

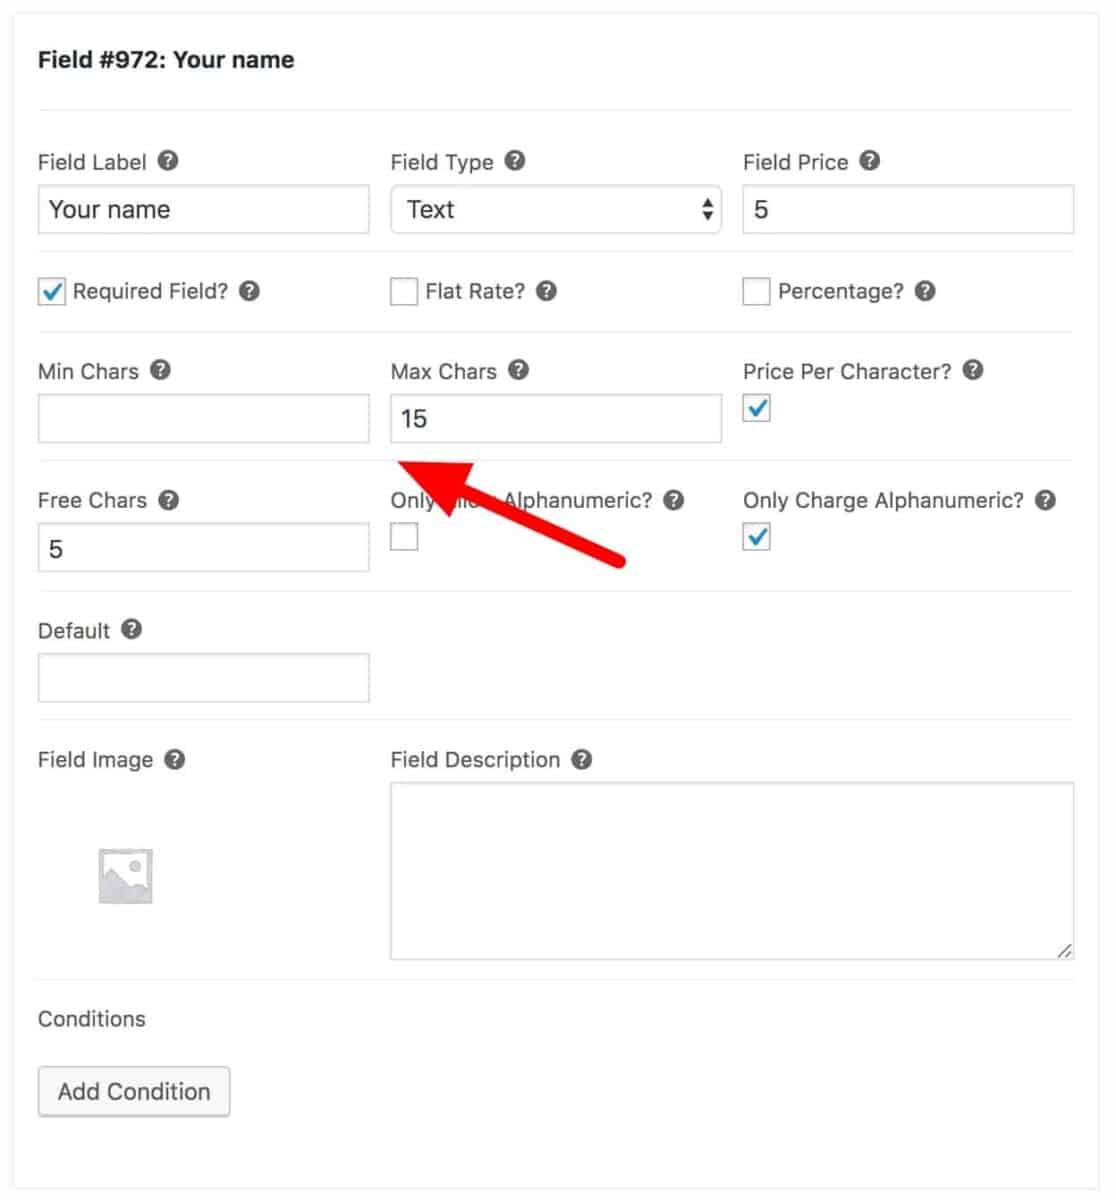
Defining a minimum or maximum number of characters in a text field

If you would like to set a minimum and/or maximum number of characters that the user can enter in the field, just add values to the ‘Min Chars’ and ‘Max Chars’ fields.
The user will be prevented from entering too many characters and the product will fail validation when the user clicks Add to Cart.
Add minimum or maximum number of characters to text field

Charging a price per character in WooCommerce

Depending on your print or engraving costs, you might want to charge a price per character for your custom field. Select the ‘Price Per Character’ checkbox to multiply the number of characters by the field price.
WooCommerce text field price per character

Charging per character but allow some free characters

If you’ve got the ‘Price Per Character’ field enabled, you might want to let your customers enter some free characters before you start charging them. Just enter a figure in the ‘Free Chars’ field.

Alphanumeric characters

There are a couple of options for the use of alphanumeric characters. If you wish, you can restrict the input to alphanumeric characters only. Secondly, you could allow non-alphanumeric characters (like spaces or punctuation) but only charge for alphanumeric.

Charging custom meta data as a fixed fee

By default, the field price that you set will get charged for each item that the user adds to the cart. So if they add a quantity of 5 items, the price for the custom field will get multiplied by 5.
But if you prefer to only charge a fee once, select the ‘Flat Rate’ checkbox.

Charging a percentage of product price

If you would like to charge for your custom meta data as a percentage of the product price, check the ‘Percentage?’ field. Then the value you’ve entered in the ‘Field Price’ will be used as the percentage value.

Setting a default value for custom meta data in WooCommerce

You can choose to set a default for your custom meta field so that the field will already contain a value. Just enter the value in the ‘Default’ field.

Displaying custom meta data using conditional logic

Finally, you might want to make the custom data field available to your users only under certain circumstances. You can do this using conditional logic.
For more information on setting up conditional logic for custom fields, take a look at this support article.
You can also find out more about extra product options in WooCommerce in this article.

Adding WooCommerce custom cart item data – final thoughts

Hopefully this article has been comprehensive enough to give you everything you need to know about adding custom cart item data in WooCommerce.
We looked at how to do it programmatically; and we looked at how to do it with a plugin, plus some of the advantages of doing it this.
Take a look at the WooCommerce Product Add-Ons Ultimate plugin for more information about everything you can do with this plugin.